![Facebook Retargeting: How to Setup Retargeting Audiences [Complete Guide]](https://www.sevenatoms.com/hubfs/Imported_Blog_Media/Retargeting-Audiences.jpg)
Consumers rarely buy from a company the first time they visit a site or see an offer. Most buyers want to take their time to compare prices, read reviews, and visit a site a few more times before committing.
Retargeting or remarketing is a strategy that companies use to reach back out to website visitors to remind them of what a company has to offer.
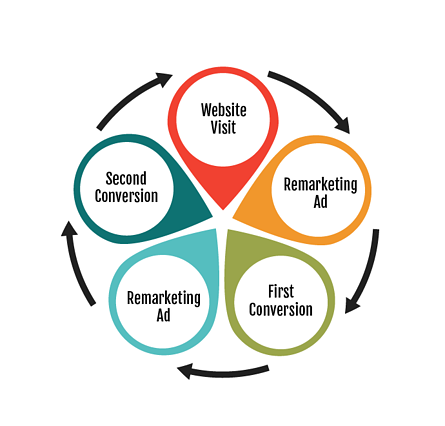
Facebook retargeting allows you to do this through targeted Facebook ad content.
Below, we’ve put together a complete guide on how to set up your retargeting campaigns on Facebook.
Setting Up the Facebook Retargeting Pixel
The first thing that you need to do when setting up a retargeting campaign on Facebook is to create a Facebook retargeting pixel. The Facebook pixel allows you to identify your website visitors so that you can retarget them on the social media platform.
To get started, use the following steps to create a Facebook pixel to add on your site:
- From the top menu, click on “Tools.”
- Click on “Pixels,” then “Facebook Pixel.”
- Choose “Create a Pixel.”
- Next, you will want to give your pixel a name. You are only allowed one pixel for your ad account, so you will want to carefully choose a name that effectively represents your business.
- Just click on “Create Pixel,” and now you’re ready to go!
Once you have created the pixel, you can then see it’s status.
However, for your website to show a “Ready” status, you will need to make sure that the pixel is installed properly. When it comes to installing your Facebook retargeting pixel on your website, you may need some help from a developer. Facebook offers the Facebook Pixel Helper, which is a Google Chrome extension that you can use to verify that your Facebook pixel has been installed properly. You can also use the helper to troubleshoot any issues.
Tracking Standard Events with the Facebook Pixel
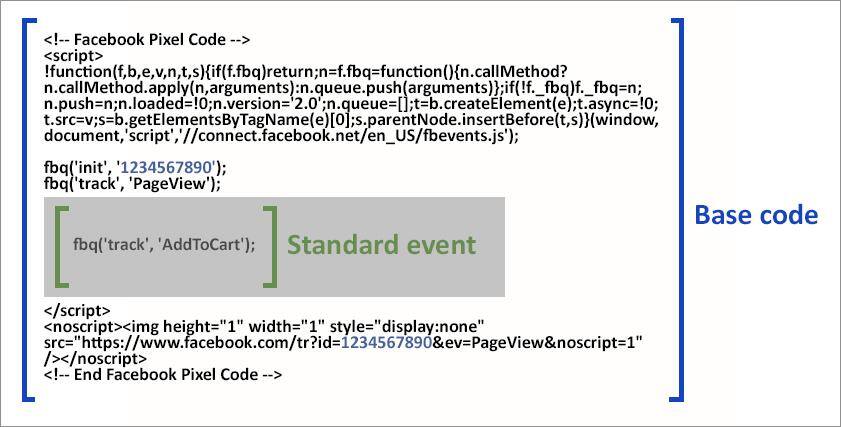
If you want to add conversion tracking to your pixel, you can add Standard Events to your pixel. Standard events allow you to track specific actions that people take on your site. For example, you may want to track when someone adds an item to their cart. For each event that you want to monitor, you will need to include a piece of code on your website that allows Facebook to recognize when an individual is taking the desired action.
Source
To set up standard event tracking, use the following steps:
- Go to your Facebook Ads Manager and click on the Pixels tab.
- Then click on “Install Events.”
- You will then see a toggle icon next to the different events that you can track such as “Purchase,” “Lead,” “Add to Cart,” “Search,” and “View Content.” Choose which event you want to track.
- You will be given the option to “Track Event on Page Load” or “Track Event on Inline Action.” If the action that you want to track can be tracked when someone lands on a certain page, like a purchase confirmation page, then you will use Track Event on Page Load. If the action that you want to track requires the user to click on something, such as an add to cart button, then you will choose Track Event on Inline Action.
- Now it’s time to add event parameters to measure additional information about the event. Here is where you can add a conversion value, currency, and other parameters.
After you have set up the event that you want to track, you now need to copy and paste the event code on the proper site page without modifying the pixel code that you’ve already put on your site. If you are tracking a page load event, you will place the code just below the closing section of the specific site page. If you are tracking inline action, then you will add the code between script tags next to the action you’re tracking.
Use Custom Conversions for More Customization
If you can’t add standard events to your website, then you can use custom conversions to track conversions. Custom conversions can also be helpful if you are already using standard events, but you want more customization. For instance, let’s say you are a cosmetics company and you have been using the “ViewContent” standard event for all your products. However, you want to be able to optimize for separate categories. This would be an example of when custom conversions can come in handy. Custom conversions will allow you to split your product categories into separate conversions.
Source
You can create custom conversions using URL rules. To create a custom conversion, go to “Custom Conversions” then click on “Create Custom Conversion.” You can then add the URL that represents your custom conversion. You can either use URL Equals or URL Contains. If you’re using URL Equals, make sure that you include the domain.
After you have done this, you will choose a category, and click on “Next.” You will then need to name your custom conversion and create a description. If there is a conversion value, you will want to include it as this allows you to view your ROI on ad spending in your reports. For instance, if you’re selling an e-book worth $25, you will put $25 as the conversion value. Then, click on “Create” and “Done.”
Now you are able to create an add using the website conversions objective. When you create the add, select which custom conversion you are optimizing for and you will then be able to track that conversion.
Facebook Retargeting Audiences Based on Customer Files
One way that you can retarget consumers is by using the customer data that you have on file to reach back out to those who have shown interest in your company. This option allows you to use customer information from your database that you have gathered from those who have made a purchase or filled out a lead form in order to retarget these consumers on Facebook.
Before you get started, you will want to make sure that your customer file is formatted properly so that you can get the most out of this targeting option. As you are formatting data to use in your Facebook retargeting campaign, be sure to use Facebook’s best practices for Customer Files to help increase your match rate.
Once you have your data formatted correctly, it’s time to start creating a Custom Audience from this file:
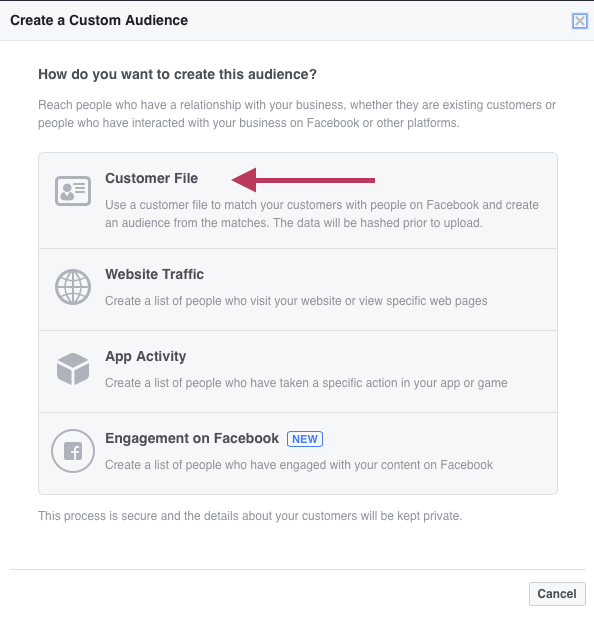
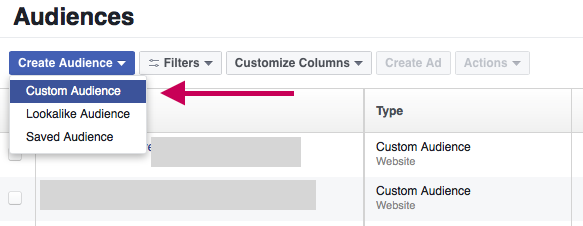
- Go to “Audiences.” If you already have audiences, you can click on the “Create Audience” dropdown menu option and select “Custom Audience.” If you don’t have any audiences yet, you will see audience creation buttons instead of a dropdown. In this case, you will want to click on “Create a Custom Audience.”

- Then click on “Customer File,” and “Add from your own file.”
- When you add the customer file, you can either upload the file or copy and paste the information. Make sure that you are not mixing data types. For instance, if you are using emails, make sure that every entry on the list is an email. (Don’t mix emails and phone numbers.) Then, you’ll want to name your audience and add a description. Then click, “Next.”
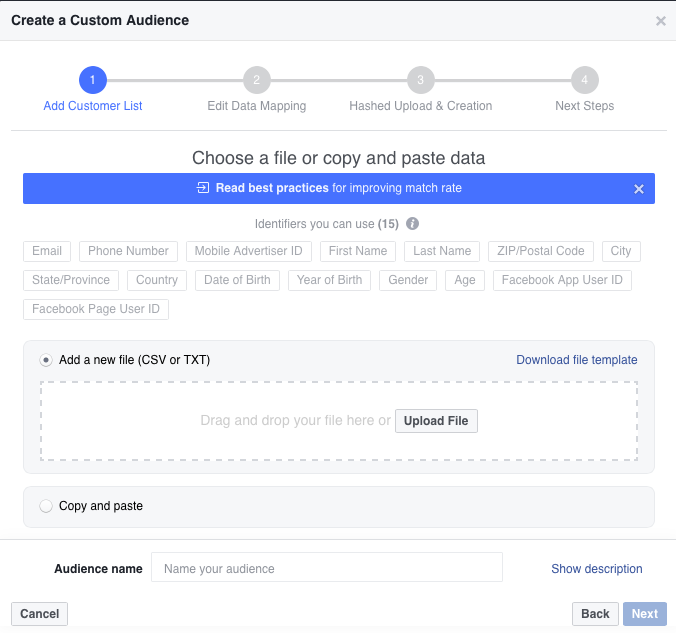
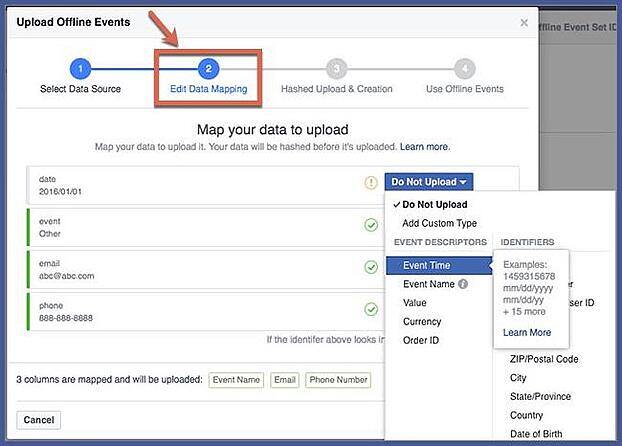
- You then have the option to edit data mapping. This is where Facebook will show you a preview of the data and how they choose to classify it. Here, you have the opportunity to change the data type, remove data from match consideration, and change the data format.
Source
After you have done this, Facebook will then hash your data, upload it, and create the audience. If the file is large, this step can take a little while. After Facebook has created the custom audience for you, they will generate a list of suggested next steps that will help you get the most out of this custom audience.
Facebook Retargeting Audiences Based on Website Traffic
In addition to using customer data for Facebook retargeting, you can also remarket to audiences based on website traffic. This is a great option for companies that may not have an extensive database of emails, phone numbers, or Facebook user IDs. By using the Facebook pixel that we discussed earlier you can track your website visitors and reach back out to them with tailored Facebook retargeting ad content.
Once you have implemented and verified your Facebook pixel, you can now begin to serve remarketing Facebook ad content to your website visitors. Use the following steps to get started creating this custom audience:
- Go to the Facebook Ads Manager.
- Click on “Tools” and then choose “Audiences.
- Click “Create Audience,” and select “Custom Audience.”
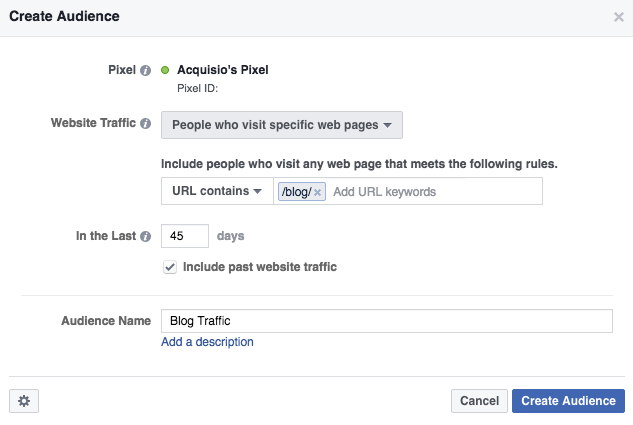
- Then click on the “Website Traffic” option.

- You will want to give this custom audience a name before clicking on “Create Audience.”

With retargeting audiences, you can target those who have visited specific pages of your site, such as the “pricing” page or a specific category page. To do this, enter some URL keywords into the website traffic box. This allows you to target individuals who have visited site pages that include these keywords in the URL. You will also want to choose a number of days to track this audience in the “Audience History” option. By default, it will track this audience for 30 days, but you can change it to up to 180 days.
Creating Facebook Retargeting Audiences
There are many different retargeting audiences that you can use to reach back out to those who have already shown an interest in your brand. We’ve already discussed how to create a Custom Audience from your website traffic, but here are some ideas for retargeting strategies that may help you get the most out of this Facebook ad option:
Source
- Retarget your blog readers or those who have downloaded gated content with Facebook ads that deliver similar or relevant content that this audience will find useful.
- Serve Facebook retargeting ad content to those who have visited a particular landing page with more information on the offer they showed interest in.
- Remarket to those who have used a free trial of your product or service with promotional pricing that’s available for a limited time.
Facebook retargeting is an important marketing strategy for any business that wants to reengage consumers who have shown interest in their products or services. However, the intricacies of retargeting customers on Facebook can be a bit confusing for those who are new to Facebook advertising. If you need help with your Facebook retargeting strategy, contact the experts at SevenAtoms today for a free consultation.